Chapter 3 Navigating in Linux file system
You are in your home directory after you log into the system and are directed to the shell command prompt. This section will show you hot to explore Linux file system using shell commands.
To start, you need to take a tour of what the Linux filesystem looks like so you know where you are going.
3.1 Path
To understand Linux file system, you can image it as a tree structure (Figure 3.1).
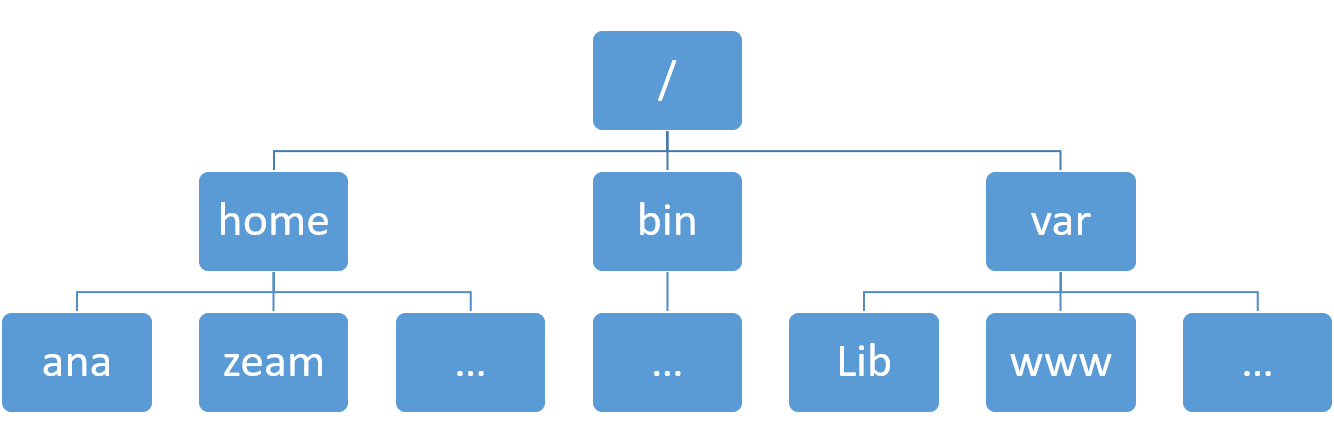
Figure 3.1: Tree structure of Linux system.
In Linux, a path is a unique location of a file or a directory in the file system.
For convenience, Linux file system is usually thought of in a tree structure. On a standard Linux system you will find the layout generally follows the scheme presented below.
The tree of the file system starts at the trunk or slash, indicated by a forward slash (/). This directory, containing all underlying directories and files, is also called the root directory or “the root” of the file system.
3.1.1 Relative and absolute path
- Absolute path
An absolute path is defined as the location of a file or directory from the root directory(/). An absolute path starts from the root of the tree (/).
Here are some examples: >/home/xie186 >/home/xie186/perl5
- Relative path
Relative path is a path related to the present working directory:
data/sample1/ and ../doc/.
If you want to get the absolute path based on relative path, you can use readlink with parameter -f:
pwd
readlink -f ../
## /data/projects/bix_book
## /data/projects3.2 Surfing in Linux file system
Once we enter into a Linux file system, we need to 1) know where we are; 2) how to get where we want; 3) how to know what files or directories we have in a particular path.
3.2.1 Check where you are using command pwd
In order to know where we are, we need to use pwd command. The command pwd is short for “print name of current/working directory.” It will return the full path of current directory.
Command pwd is almost always used by itself. This means you only need to type pwd and press ENTER (Figure 3.2).
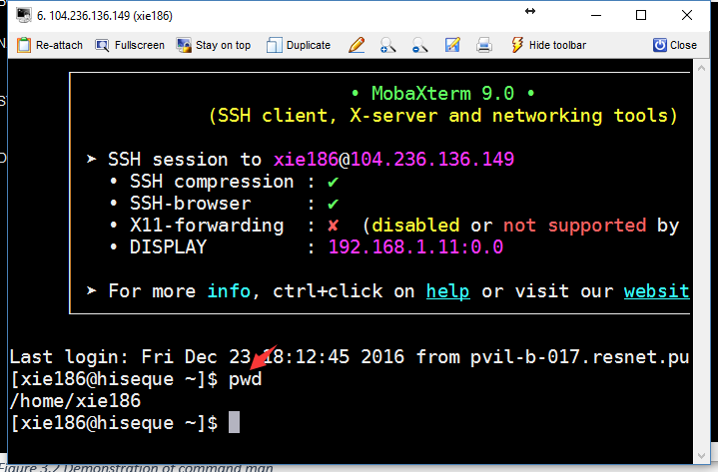
Figure 3.2: ref:linuxCMDpwd
3.2.2 Listing the contents using command ls
After you know where you are, then you want to know what you have in that
directory, we can use command ls to list directory contents (Figure 3.3). Its syntax is:
ls [option]... [file]...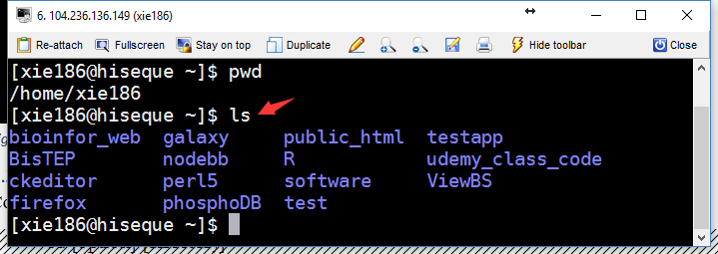
Figure 3.3: ref:linuxCMDls
ls with no option will list files and directories in bare format. Bare format means the detailed information (type, size, modified date and time, permissions and links etc) won’t be viewed. When you use ls by itself (Figure 3.3), it will list files and directories in the current directory.
cd tables
ls
echo "ls -a"
ls -a
echo "ls -t"
ls -t## 10_PerlInputOutput_bak.Rmd
## linuxPathShortcuts.tsv
## regexp_perl.tsv
## textEditorLinuxVi3modes.csv
## ls -a
## .
## ..
## 10_PerlInputOutput_bak.Rmd
## linuxPathShortcuts.tsv
## regexp_perl.tsv
## textEditorLinuxVi3modes.csv
## ls -t
## regexp_perl.tsv
## 10_PerlInputOutput_bak.Rmd
## linuxPathShortcuts.tsv
## textEditorLinuxVi3modes.csvls -l -a tables/## total 28
## drwxrwxrwx 2 rstudio rstudio 4096 May 19 2019 .
## drwxrwxrwx 20 rstudio rstudio 4096 Dec 28 03:00 ..
## -rw-rw-rw- 1 rstudio rstudio 4139 Apr 15 2019 10_PerlInputOutput_bak.Rmd
## -rw-rw-rw- 1 rstudio rstudio 223 Apr 15 2019 linuxPathShortcuts.tsv
## -rw-rw-rw- 1 rstudio rstudio 259 May 19 2019 regexp_perl.tsv
## -rw-rw-rw- 1 rstudio rstudio 766 Apr 15 2019 textEditorLinuxVi3modes.csvLinux command options can be combined without a space between them and with a single - (dash).
The following command is a faster way to use the l and a options and gives the same output as the Linux command shown above.
ls -la 3.2.3 Change directory using command ‘cd’
Command cd is used to change the current directory. It’s syntax is:
cd [option] [directory]Unlike pwd, when you use cd you usually need to provide the path (either absolute or relative path) which we want to enter.
If we didn’t provide any path information, we will change to home directory by default.
3.3 Path shortcuts
In Linux, there are three commonly used path shortpaths (Table 3.1).
| Path | Shortcuts | Description |
|---|---|---|
| Single dot | . | The current folder |
| Double dots | .. | The folder above the current folder |
| Tilde character | ~ | Home directory (normally the directory:/home/my_login_name) |
| Dash | - | Your last working directory |
Here are some examples:
cd ~
pwd
ls
ls ../
##
pwd
cd ../
pwd
cd ./
pwdEach directory has two entries in it at the start, with names . (a link to itself) and .. (a link to its parent directory). The exception, of course, is the root directory, where the .. directory also refers to the root directory.
Sometimes you go to a new directory and do something, then you remember that you need to go to the previous working direcotry. To get back instantly, use a dash.
# This is our current directory
pwd
# Let us go our home diretory
cd ~
# Check where we are
pwd
# Let us go to your previous working directory
cd -
# Check where we are now
pwd## /data/projects/bix_book
## /home/rstudio
## /data/projects/bix_book
## /data/projects/bix_book3.4 Manipulations of files and directories
In Linux, manipulations of files and directories are the most frequent work. In this section, you will learn how to copy, rename, remove, and create files and directories.
3.4.1 Command cp
In Linux, command cp can help you copy files and directories into a target directory.
3.4.2 Command mv
The command mv is short for move (or rename) files.
3.4.2.1 Move one file
Here is one common example of mv.
mv file1 directory1/3.4.2.2 Move multiple files into a directory
mv file1 file2 file3 target_direcotry/3.4.2.3 Move a directory
mv dir13.4.2.4 Rename a file or a directory
3.4.3 Command mkdir
Command mkdir is short for make directory.
The syntax is shown as below:
mkdir [OPTION ...] DIRECTORY ...mkdir directoryMultiple directories can be specified when calling mkdir.
mkdir directory1 directory23.4.3.1 How to create a directory
mkdir -p foo/bar/bazHow to defining complex directory trees with one command
mkdir -p project/{software,results,doc/{html,info,pdf},scripts}This will create a direcotry trees as shown below:
$ tree project/
project/
├── doc
│   ├── html
│   ├── info
│   └── pdf
├── results
├── scripts
└── software

7 directories, 0 files
The command line above will directories foo, foo/bar, and foo/bar/baz if they don’t exist.
3.4.4 Command ‘rm’
You can use rm to remove both files and directories.
3.4.4.1 How to remove a file or multiple files
## You can remove one file.
rm file1
## `rm` can remove multiple files simutaneously
rm file2 file3
3.4.4.2 How to remove a folder
If a folder is empty, you can remove it using rm with -r.
rm -r FOLDERIf a folder is not empty, you can remove it using rm with -r and -f.
mkdir test_folder
rm -r test_folder
3.5 Viewing text files in Linux
3.5.1 Command cat
The command cat is short for concatenate files and print on the standard output.
The syntax is shown as below:
cat [OPTION]... [FILE]...For small text file, cat can be used to view the files on the standard output.
cat data/testdata4linux_cmd.txt## gene1
## gene2
## gene3
## gene4
## gene5
## gene6
## gene7
## gene8
## gene9
## gene10
## gene11
## gene12
## gene13
## gene14
## gene15
## gene16You can also use cat to merge two text files.
cat file1 file2 > merged_file3.5.2 Command more and less
The command more is old utility. When the text passed to it is too large to fit on one screen, it pages it. You can scroll down but not up.
The syntaxt of more is shown below:
more [options] file [...]The command less was written by a man who was fed up with more’s inability to scroll backwards through a file. He turned less into an open source project and over time, various individuals added new features to it. less is massive now. That’s why some small embedded systems have more but not less. For comparison, less’s source is over 27000 lines long. more implementations are generally only a little over 2000 lines long.
The syntaxt of less is shown below:
less [options] file [...]3.5.3 Command head and tail
The command head is used to output the first part of files. By default, it outputs the first 10 lines of the file.
head [OPTION]... [FILE]...Here is an exmaple of printing the first 5 files of the file:
head -n 5 code_perl/variable_assign.pl## #!/usr/bin/perl
## use warnings;
## use strict;
##
## #assign two strings to two variablesIn fact, the letter n does not even need to be used at all. Just the hyphen and the integer (with no intervening space) are sufficient to tell head how many lines to return. Thus, the following would produce the same result as the above commands:
head -5 data/testdata4linux_cmd.txt## gene1
## gene2
## gene3
## gene4
## gene5The command tail is used to output the last part of files. By default, it prints the last 10 lines of the file to standard output.
The syntax is shown below:
tail [OPTION]... [FILE]...Here is an exmaple of printing the last 5 files of the file:
tail -5 data/testdata4linux_cmd.txt## gene12
## gene13
## gene14
## gene15
## gene16To view lines from a specific point in a file, you can use -n +NUMBER with the tail command. For example, here is an example of viewing the file from the 2nd line of the line.
tail -n +2 data/testdata4linux_cmd.txt## gene2
## gene3
## gene4
## gene5
## gene6
## gene7
## gene8
## gene9
## gene10
## gene11
## gene12
## gene13
## gene14
## gene15
## gene163.5.4 Auto-completion
In most Shell environment, programmable completion feature will also improve your speed of typing. It permits typing a partial name of command or a partial file (or directory), then pressing TAB key to auto-complete the command (Figure 3.4). If there are more than one possible completions, then TAB will list all of them (Figure 3.4).
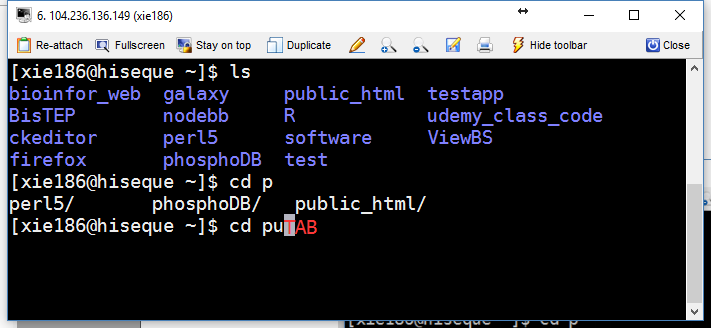
Figure 3.4: Demonstration of programmable completion feature.
3.6 Understand standard input and stardard output
In the Linux environment, input and output is distributed across three streams: standard input (STDIN), standard output (STDOUT), standard error (STDERR). These three streams are also numbered: STDIN (0), STDOUT (1), STDERR (2).
3.6.1 STDIN
… The standard input stream typically carries data from a user to a program. Programs that expect standard input usually receive input from a device, such as a keyboard. Standard input is terminated by reaching EOF (end-of-file). As described by its name, EOF indicates that there is no more data to be read.
To see standard input in action, run the cat program. Cat stands for concatenate, which means to link or combine something. It is commonly used to combine the contents of two files. When run on its own, cat opens a looping prompt. …
tail
1
2
3
`CTRL+D`
1
2
3
3.6.2 STDOUT
Data that is generated by a program will be written by STDOUT. If the STDOUT is not redirected, it will output the data on to the terminal.
stdout="Hello world"
echo $stdout
## Hello worldThe STDOUT can be redirected to a file. See the example below:
stdout="Hello world"
echo $stdout > data/test_output.txt
# cat the data
cat data/test_output.txt
## Hello world3.6.3 STDERR
During a program’s execution, some errors may be generated when the program fails at some parts. STDERR will help you write the errors. By default, the STDERR will be outputed onto the terminal.
Here is an example of STDERR
ls NOTAFILE## ls: cannot access 'NOTAFILE': No such file or directory3.7 Find Disk Usage of Files and Directories
The Linux du (short for Disk Usage) is a standard Unix/Linux command, used to check the information of disk usage of files and directories on a machine. The du command has many parameter options that can be used to get the results in many formats. The du command also displays the files and directory sizes in a recursively manner.
du data/ESP6500-African_American.vcf.gz
du -h data/ESP6500-African_American.vcf.gz
## 27388 data/ESP6500-African_American.vcf.gz
## 27M data/ESP6500-African_American.vcf.gzTo get the summary of a grand total disk usage size of an directory use the option “-s” as follows.
du -sh data/## 38M data/Using “-a” flag with “du” command displays the disk usage of all the files and directories.
du -ah data/## 4.0K data/test_ref2_30.fa
## 4.0K data/sgRNA_count_norm4gini_index.txt
## 9.3M data/Arabidopsis_thaliana.TAIR10.37.gff3.gz
## 4.0K data/stcp-Rdataset-Diet.csv
## 4.0K data/WGBS_sample_information.txt
## 4.0K data/nhanes_2015_2016.csv.README
## 4.0K data/gene_annotation.txt
## 4.0K data/DMR_region.txt
## 4.0K data/DEG_list.txt
## 4.0K data/test_ref_len.txt
## 532K data/ESP6500-African_American.vcf.gz.tbi
## 4.0K data/README
## 4.0K data/test_ref.fa
## 4.0K data/PYL10_ARATH.fasta
## 0 data/regexp_perl.txt
## 88K data/maize_embryo_specific_gene_Sheet1.tsv
## 8.0K data/WGBS_example_data/EV1.fastq
## 12K data/WGBS_example_data
## 4.0K data/famous_people.txt
## 4.0K data/test_ref2.fa
## 4.0K data/test_output.txt
## 748K data/nhanes_2015_2016.csv
## 27M data/ESP6500-African_American.vcf.gz
## 4.0K data/DMR_region_merged.txt
## 4.0K data/testdata4linux_cmd.txt
## 8.0K data/Pneumonia_china_2020.RDS
## 38M data/3.8 Advanced topic
3.8.1 Linux md5sum Command
md5sum is used to verify the integrity of files, as virtually any change to a file will cause its MD5 hash to change. Most commonly, md5sum is used to verify that a file has not changed as a result of a faulty file transfer, a disk error or non-malicious meddling. The md5sum program is included in most Unix-like operating systems.
echo "The MD5 value of index.Rmd is: "
md5sum index.Rmd
cp index.Rmd index.Rmd_bak
echo "The MD5 value of index.Rmd_bak is: "
md5sum index.Rmd_bak
echo "The MD5 value of new index.Rmd_bak is: "
head index.Rmd > index.Rmd_bak
md5sum index.Rmd_bak
## The MD5 value of index.Rmd is:
## 8a08026382b5fe49d9f764534976b0fc index.Rmd
## The MD5 value of index.Rmd_bak is:
## 8a08026382b5fe49d9f764534976b0fc index.Rmd_bak
## The MD5 value of new index.Rmd_bak is:
## 6c6d75e8839891bf7ba1ab152c8f267c index.Rmd_bak